Are you thinking about growing oyster mushrooms in buckets but feeling a bit unsure? No worries, my friend! I’ve got you covered with some helpful information.
First of all, let me assure you that growing oyster mushrooms can be totally worth it. According to Fortune Business Insights, there is a growing demand for mushroom cultivation worldwide. So, it’s high time to dive into this!
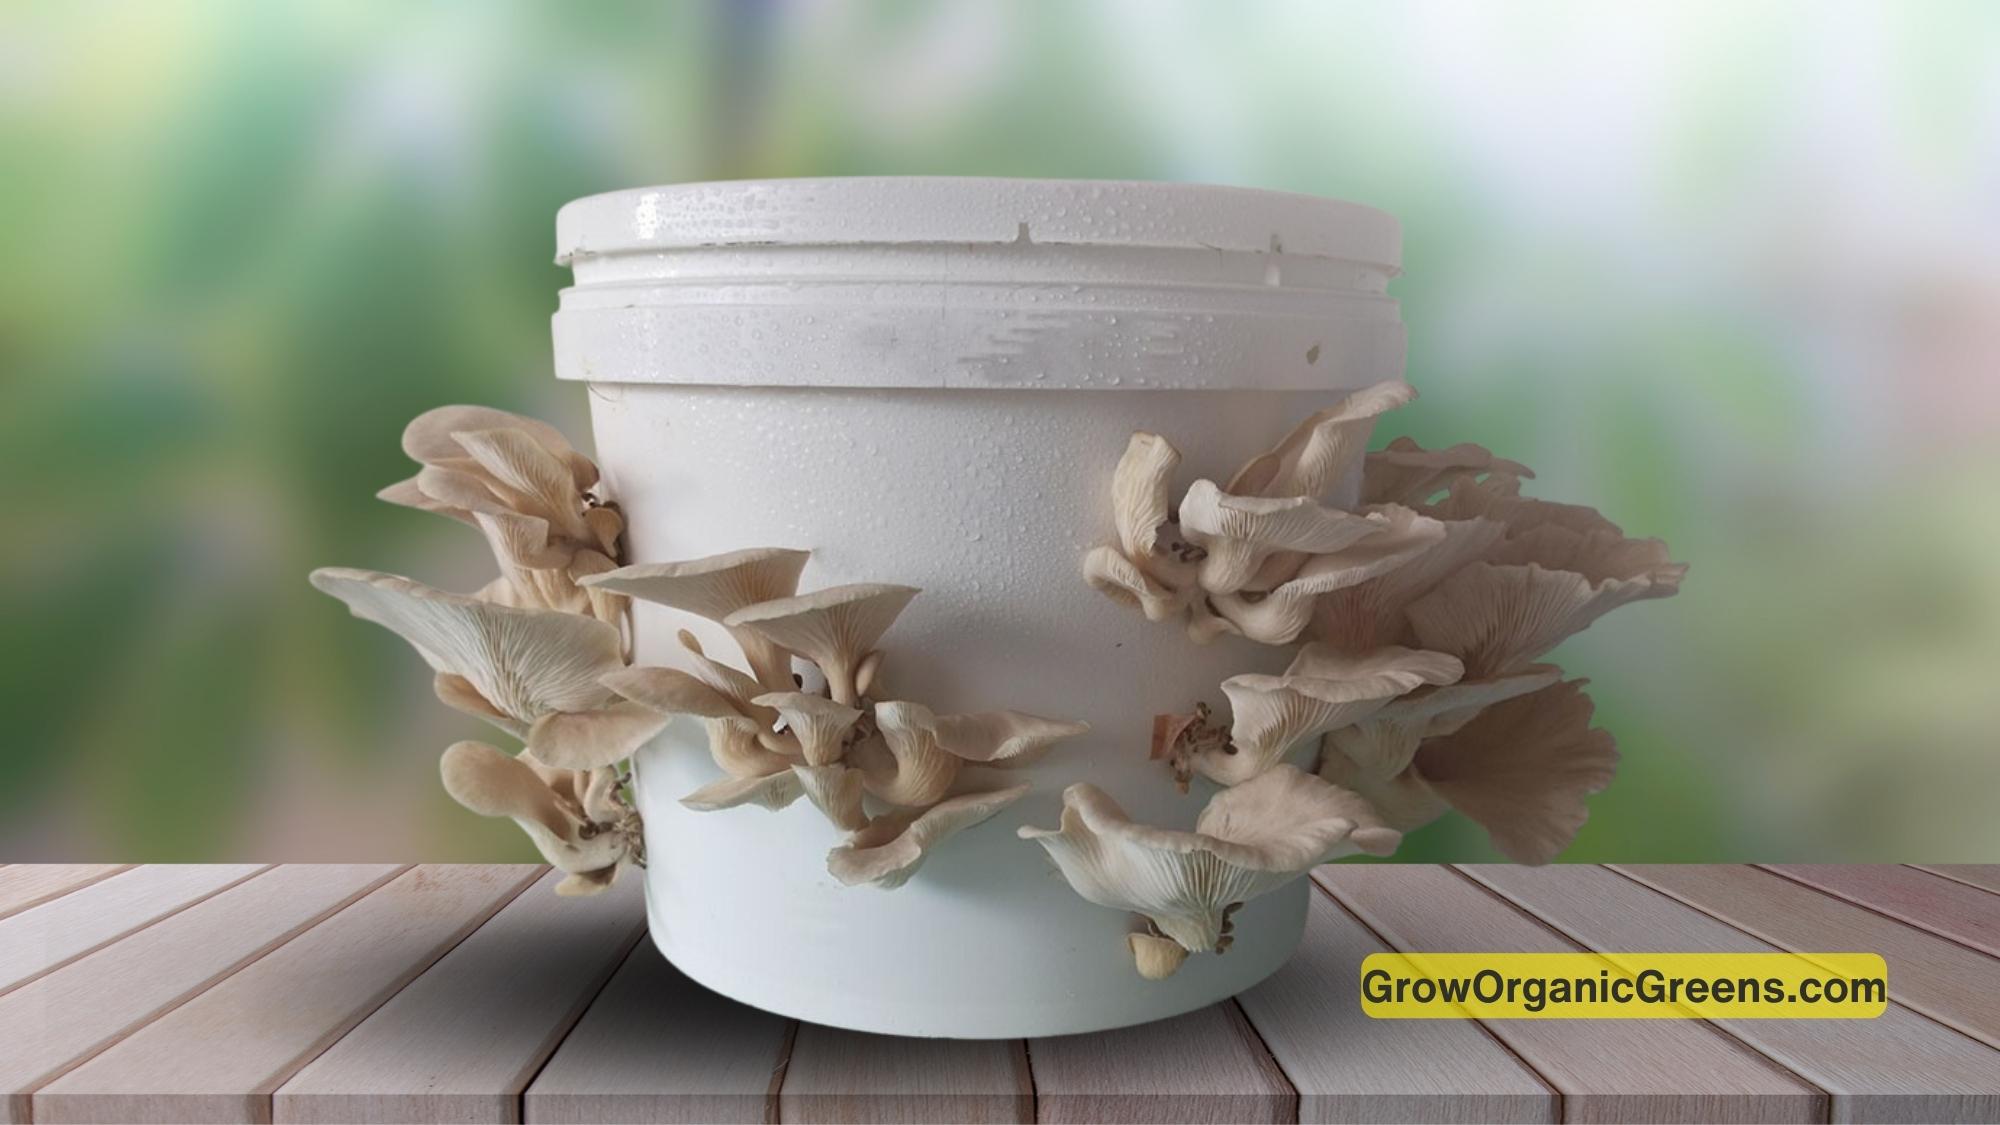
The best part about growing oyster mushrooms is you can grow them in buckets at home as well. This is not just another airy-fairy idea. Plus is that it’s profitable and easy to manage. You will get all the essential information and steps to start and nurture a new hobby or even explore a potential business opportunity.
Now, let’s dive into the nitty-gritty of growing oyster mushrooms in buckets. Buckle up, and let’s get started!
Different Varieties of Oyster Mushrooms
In order to grow oyster mushrooms in buckets, you must know how many varieties are there and which one is most suitable for you to grow.
There are several delicious varieties to explore. Each variety has its own unique shape and color, making them easy to distinguish.
Beyond their appearances, oyster mushroom varieties also differ in taste and nutritional content. So, there’s more than meets the eye!
Be aware that there are some mushrooms out there that may resemble oyster mushrooms but don’t belong to the oyster group. Stay informed to avoid any confusion.
To dive into the details and discover the distinguishing characteristics of each oyster mushroom variety, click the link below and check out our article on “Oyster Mushroom Variety.”
[Oyster Mushroom Variety]
Process Of Growing Oyster Mushrooms In Buckets
You can grow oyster mushrooms in buckets by following the below steps:
| STEP 1 | > First thing is the pasteurization of the straw (substrate). Heat up the straw in water at around 80 degrees Celsius temperature and keep it in the hot water for 1 hour to kill bacteria. > If you use a cold water lime bath for pasteurization, leave them in the solution overnight. > After draining the water, put the straw in a pot and cut it into pieces 1-3 cm in length > Don’t put the mushroom spawn into the heated straw. Let it cool down to room temperature otherwise, temperature will kill the spawn. > Straw should not be wet but must be damp. |
| STEP 2 | > After cooling down, put the straw in the plastic bucket and close the lid of the bucket. Distribute some of the oyster mushroom spawn (3 or 4 pieces) throughout the straw. > Make holes in the sides and bottom of the buckets with a skewer to aerate the bucket every 3 inches. Cover the holes with micropore tape during the incubation period so that the moisture can be intact and allows air exchange. > Before using the skewer, make assured that the skewer is properly sterilized. > Side holes are required to ventilate the bucket for releasing the CO2 concentration. > Bottom holes require to pass out the excess water. Standing water is bad for mushrooms. >The bucket should be kept in a room where direct sunlight does not come. The spawn requires indirect sunlight for their growth into mushrooms. Temperature should remain at 15-20 degree Celsius. |
| STEP 3 | > First make a bed of substrate, then spread some spawn. > After that create another bed on top of the earlier bed and spread another layer of spawn. > Continue doing it until the bucket is full. > To keep your bucket moist, continue to spray some water if required. Water should not be dropped. |
| STEP 4 | >Like white furry cobwebs, the mycelium will start to come out during the first couple of weeks. > Latest by 4 weeks, mushroom starts forming. > Mushrooms grow double every day and within a week, they will get good size. > Keep the mushrooms moist by spraying water 2-3 times a day. Be cautious about not using excess water. |
| STEP 5 | > Mushrooms should be harvested while their rims are still curled over a little and pointing downwards. > Leaving the very bottom still in the bucket, you may cut the mushrooms. > From that very bottom, subsequent flushes will be formed. Under suitable conditions, you can get 3-4 flushes of mushrooms. |
| STEP 6 | > After the production of 3 or 4 flushes of mushrooms, it will stop producing. >You can use the straw as mulch for your kitchen garden. > You can add some of your old straw with the new one as the substrate of the new bunch of production. |

The Benefits of Growing Oyster Mushrooms In Buckets
Re-usability:
A bucket is a sturdy option for a mushroom-growing pot. Unlike plastic bags or other containers, you can use the bucket multiple times without having to discard it.
Readily Available:
Buckets are easily accessible in the market. You can choose any size, but a 55-gallon bucket is often recommended. Just make a few holes in it, and you’re good to go as a mushroom-growing pot.
Easy to Handle:
Transferring the mushroom growing bucket from one place to another is a breeze. You can move it around without disturbing the growing process of the mushrooms.
Less Environmental Impact:
Buckets are more durable than plastic bags, resulting in fewer environmental issues. By opting for buckets, you contribute to reducing waste and promoting sustainability.
No Special Skills Required:
You don’t need any special skills to handle a bucket as a mushroom-growing pot.
By following the proper precautions and steps of mushroom cultivation, you can achieve multiple flushes from a single cultivation process.

Contamination Control:
Mushrooms are prone to get contaminated by other fungi or bacteria. Preventing those contaminations is crucial for good quality mushrooms.
Buckets provide a controlled environment that can be easily sterilized and sanitized, reducing the risk of contamination and ensuring a healthier mushroom crop.
Harvesting Convenience:
Oyster mushrooms are typically harvested by hand, and using buckets makes this process more convenient.
You can easily access the mushrooms by removing the bucket’s lid or cutting a hole in the side, allowing for straightforward harvesting without disturbing the rest of the growing substrate.
Year-round cultivation:
Oyster mushrooms can be cultivated year-round, and using buckets facilitates indoor cultivation. By controlling factors such as temperature, humidity, and lighting, you can create a suitable environment for continuous mushroom production irrespective of the external weather conditions.
Scalability:
Buckets offer scalability options for mushroom cultivation. You can start with a few buckets and gradually expand your operation as you gain experience and demand for your mushrooms increases.
This allows you to manage your cultivation according to your resources and market requirements.
With these benefits, using buckets for growing oyster mushrooms is a practical and user-friendly choice. Get ready to embark on your mushroom-growing journey with ease and success!
Challenges And Precautions

Proper ventilation :
During fruiting, proper ventilation is crucial for mushrooms. High concentrations of CO2 hinder colonization a.k.a fruiting and affect the health of the mushrooms.
Ensure adequate air ventilation during the fruiting stage to prevent CO2 buildup.
Contaminated Substrate:
Mushrooms are susceptible to contamination from bacteria and other fungi.
If you notice any signs of contamination, take immediate action.
Discard any contaminated mushrooms and replace the affected substrate to minimize the risk of further spread.
Pins Not Forming:
High CO2 concentration or contamination can hinder the formation of mushroom pins or prevent them from forming altogether.
Regular monitoring is essential to detect and address these issues promptly.
Aborted Pins:
Sufficient moisture is vital for mushroom growth.
If humidity levels drop, the pins of the mushrooms may abort prematurely.
Ensure a consistent humidity level to prevent this issue and support healthy pin development.
Temperature control:
Oyster mushrooms have specific temperature requirements for successful cultivation.
Extreme temperature fluctuations can negatively impact growth or increase the risk of contamination.
Monitor and maintain the recommended temperature range for your oyster mushroom strain.
Try to provide a temperature-controlled environment or insulation if growing in a location with variable temperatures.
Pest management:
While oyster mushrooms are relatively resistant to pests, certain insects or mites can still pose a threat.
Regularly inspect your growing area for signs of pests and take appropriate measures if an infestation occurs.
You can use organic pest control methods or introduce beneficial insects to control pest populations.
Light exposure:
Oyster mushrooms are typically grown in low-light conditions.
Excessive exposure to direct sunlight can inhibit growth and lead to heat buildup within the buckets.
Place the buckets in a shaded area or use indirect light sources such as fluorescent or LED lights for optimal mushroom development.
Quality of substrate and spawn:
The quality of the substrate and spawn used for mushroom cultivation greatly impacts the success of the process.
Ensure that you obtain high-quality spawn from reputable sources.
Prepare or purchase a suitable substrate mix that is free from contaminants and properly pasteurized or sterilized.
By being aware of these threats and taking necessary precautions, you can maximize the success of your oyster mushroom cultivation in buckets. Stay vigilant, maintain optimal conditions, and enjoy a bountiful harvest!

How Much Oyster Mushrooms Can You Grow In A 5-Gallon Bucket?
In a 5-gallon bucket, you can expect an average yield of 1.75 lbs of oyster mushrooms per gallon of substrate. That means a total of 8.75 lbs of oyster mushrooms in just one week!
In this video, you can have an idea of how to use buckets to grow mushrooms.
Cost of Growing Oyster Mushrooms in Buckets
Let’s break down the cost of growing oyster mushrooms in buckets into two categories.
Fixed Cost
This is a one-time investment that covers essential items. Once you’ve incurred this cost, you can reuse these items multiple times.
Variable Cost
This cost is incurred whenever you start a fresh cultivation of oyster mushrooms. It covers the materials needed for each new batch.
So, now you have a clear understanding of the costs involved. Time to get growing!
| Type of Cost | Items | Price |
| Fixed Cost | Buckets | 5-gallon plastic bucket (Heavy duty) price around ~ $5 to $15. |
| Racks | 5-shelving racks with wheels (Heavy duty, alloy steel) pice around ~$ 54 to $76. | |
| Skewer | Metal skewer price is around ~ $ 14 to $19. | |
| Sprayer | .5 gallon Battery rechargeable electric plant sprayer, price around ~ $35 | |
| Hygrometer | Digital thermometers and humidity meters are priced around ~ $ 6 to $ 8 | |
| Knife/ scissor | Stainless steel knife with ergonomic handle price around ~$ 9 to $ 23 | |
| Electric Kettle | Stainless steel, cordless kettle prices around ~ $24 to $27 | |
| Variable Cost | Mushroom Spawn | 1 lb oyster mushrooms spawn mycelium price around ~ $35. Price may vary depending upon the type of oyster mushrooms spawn. |
| Substrate | 5 lbs rice straw price around ~ $22 | |
| Micropore tape | White micropore tape prices around ~ $4 to $8 | |
| Electric Bills | Depending on the climatic condition in your area, the bill may vary. | |
| Gloves | Disposable gloves priced around ~ $8 to $76 | |
| Face Masks | Disposable black/ blue masks (100 pieces) priced around ~ $9 | |
| Sanitizer | Unscented hand sanitizer (2 lit. bottle) price around ~ $6 to $134 |
You can buy these supplies from online and local markets.
Conclusion and Take Away!
Growing oyster mushrooms in buckets is a simple and rewarding way to produce fresh mushrooms at home. With a few basic supplies, you can have your own personal mushroom farm in no time!
I hope I have cleared all the doubts on this topic – the growing oyster mushrooms in buckets. If you are interested in other agricultural methods or types of vegetables and herbs suitable for your home garden then go through my other articles from the related post section(below) or recent post section(top-right).
If you have liked this article then Please don’t forget to share it with your friends and consider subscribing to my Email list(bottom-right of the page). Stay tuned to get updates on more articles like this.

Misty S is the founder and lead writer at GrowOrganicGreens.com, a comprehensive gardening resource dedicated to helping people cultivate beautiful and sustainable gardens. She has a Master’s degree in Economics and specialized studies in agricultural economics, horticulture, and soil science. Drawing from her extensive knowledge and experience, Misty shares practical gardening tips on soil preparation, organic manure composting, fertilizers, plant care, and indoor gardening, making her advice accessible and helpful to gardeners of all levels.
Despite having an high-demanding 9-5 job, Misty dedicates her personal time to researching and exploring various gardening topics. Her keen interest in gardening has grown into a passion, driving her to help new gardeners and anyone interested in starting their gardening journey.
Follow Misty’s work and the latest gardening insights and updates on Pinterest. You can reach out to Misty at mistysblogging@gmail.com.